Which is the Best WordPress Permalink Structure for SEO?
| Listen audio version |
Whenever I talked about WordPress hosting, I always mentioned that WordPress is memory-hogging CMS, and you should always go for a Web hosting, which is optimized for WordPress hosting. Many newbies make mistake by picking the hosting based on price which is not the right decision as you should consider both Prices & hosting quality to make the right decision. Here are the best WordPress hosting that you should be using.
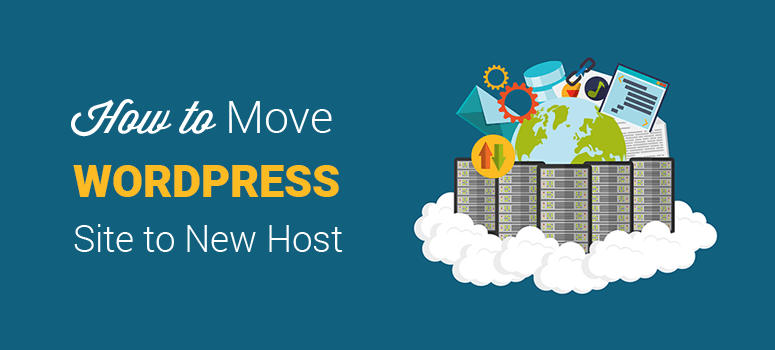
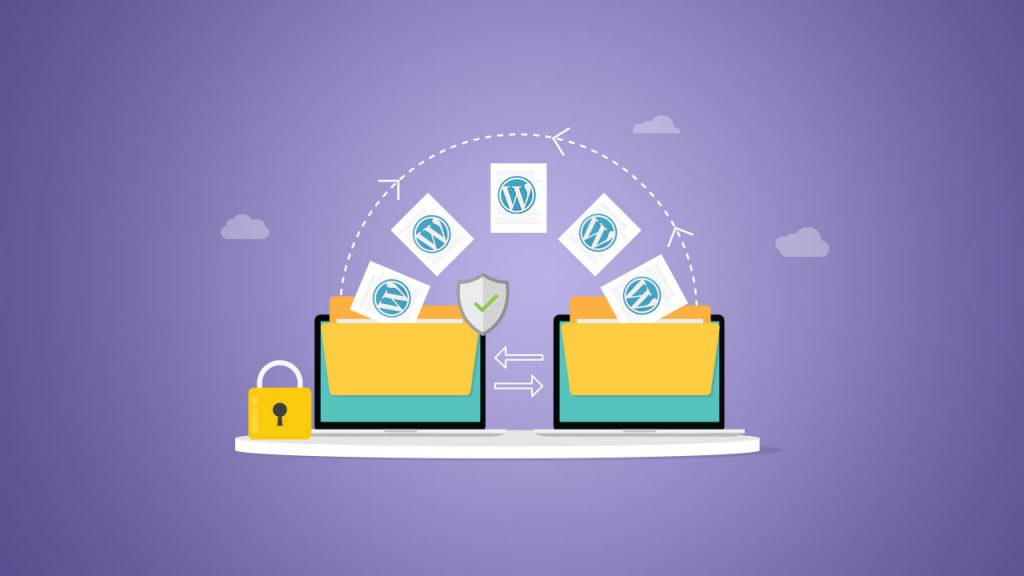
If you are looking to move WordPress site to new hosting, this guide will help you understand what all files to move & how to do it yourself. Before we move to the steps of moving WordPress hosting, let me share the backstory behind writing this DIY tutorial.
- Save
One of my WordPress clients wanted to move a WordPress blog from Dreamhost to Hostgator, as Hostgator is one of the best alternatives for Dreamhost. Here I will share the complete step by step tutorial to move WordPress site to a new host.
In this case, DreamHost uses custom cPanel, and HostGator uses standard cPanel.

Most of the popular Web hosting companies like Bluehost, SiteGround offers standard cPanel, so if you are moving to any cPanel hosting, this guide will help you to migrate WordPress site.
Page Contents
How to Migrate WordPress Site to New Hosting (Hostgator Server): Handy Guide
Alright, so it’s time to leave your crappy hosting & moving to new hosting for your WordPress blog. In this tutorial, I’m taking the example of HostGator hosting & the process would be similar for almost all the web-hosting companies.
So, I assume you already have purchased HostGator hosting, and if not, you can use coupon code “ShoutMeLoud30” to grab 30% off on the total bill.
Grab Hosting from HostGator now> (30% discount)
Now, we need to make sure everything moves with no downtime. I also suggest planning out a day like a weekend, when your website gets the least traffic.
This is to make sure; you will not lose any comments or guest post while migrating.
In this tutorial, we will move two things:
- WP-content folder from the old host
- Database of your WordPress site
- Taking backup of WP-Config file
Information and tool you need to keep handy:
- New Hosting Info
- Old Hosting Info
- FileZilla or any other free FTP tool
On DreamHost: Old hosting
Before we export wp-content and database, here we will be doing a couple of things.
- Delete all previous database backup
- Delete all Cache files (Empty cache option in your cache plugin)
- Delete all unused plugins & themes
- Delete all Spam comments, Trash comments, and trash posts. You should follow my tutorial on optimizing WordPress database to reduce the DB size. This will help in faster and error-free migration.
We are doing so many cleanups to make sure your database and wp-content size could be as small as possible.
After cleaning the database and after optimization, take a backup of WordPress database. If your database size is huge, use the gZip compression else take backup in .SQL format.
Another thing which we need to take the backup of is the WP-content folder. If you are using cPanel hosting, you can simply log into file manager from cPanel and compress your wp-content folder and take a backup, or use any FTP client and take the backup of your wp-content folder.
On HostGator: New Hosting, where you want to move WordPress
So far, at DreamHost hosting, we have taken a backup of WP-content and WordPress Database, and that is all we need to move ahead. You should also download WP-config file which is in the root folder of your FTP.
Now let’s prepare our new hosting for moving WordPress site.
Login to HostGator cPanel or new hosting account and Install WordPress on it. You can follow this guide to Install WordPress using Fantastico. Along with this, we will create a separate database and a user and associating that user with Db with all the privileges.
Create a Database + User + Associate:
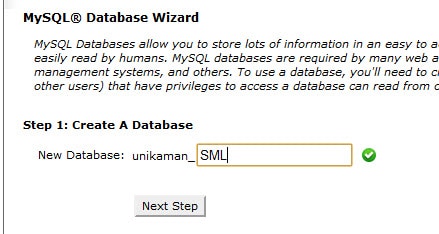
Login to your cPanel and click on Database >MySQL Database Wizard
- Save
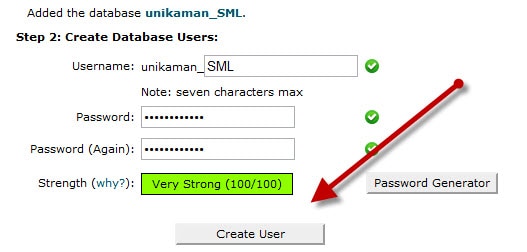
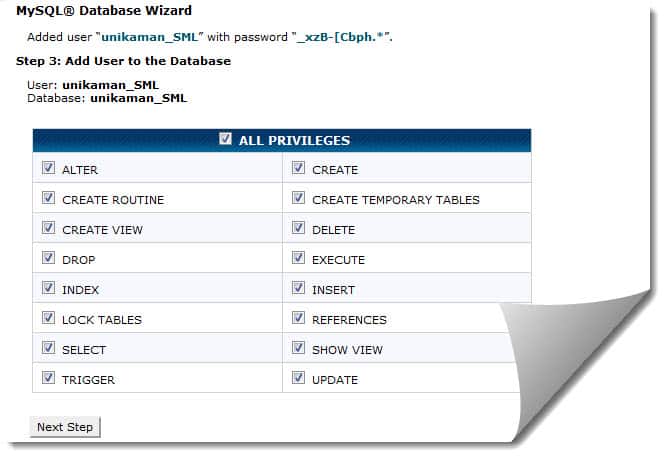
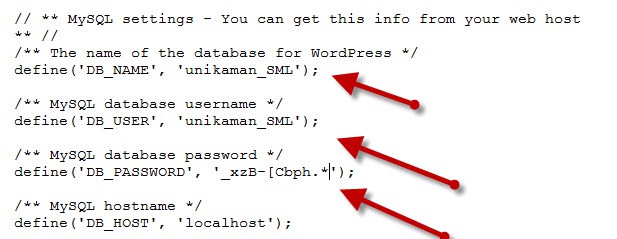
Here you will be giving a name to your database, creating a MySQL user & password and associating the user with that database. Note down all the details in a notepad, as we will need it later to make changes in the wp-config file.
- Save
- Save
So, here is the detail of the newly created database and all associated details:
- Db Name: unikaman_SML
- Db user: unikaman_SML
- Db password: _xzB-[Cbph.*
So, we are almost halfway with our WordPress hosting migration and now start the hard part. Since our goal here is to move WordPress hosting with 0 downtimes, so we will first check everything is all right before migration. For this, we will edit our Windows hosts file, and point our domain to HostGator server.
How To Create Multi-Author WordPress Blog For Guest Posting
- Read: How To Migrate WordPress Website to HostGator [Tutorial]
On HostGator cPanel, left side bottom you can find the I.P address of your hosting account and edit your hosts file to point to that I.P. This guide will help you to edit your host’s file and here is what my hosts file look like, replace the domain name with the real domain that you are migrating.

- Save
What this will do is, it will let you see your site on new Web-host on your machine, whereas, everyone else in the world will see your site running on the old hosting.
Now, open FTP and login to new hosting FTP. Upload all the content of the WP-content file (Backup from the old host) to your new hosting at the same location. public_html/domain.com/wp-content
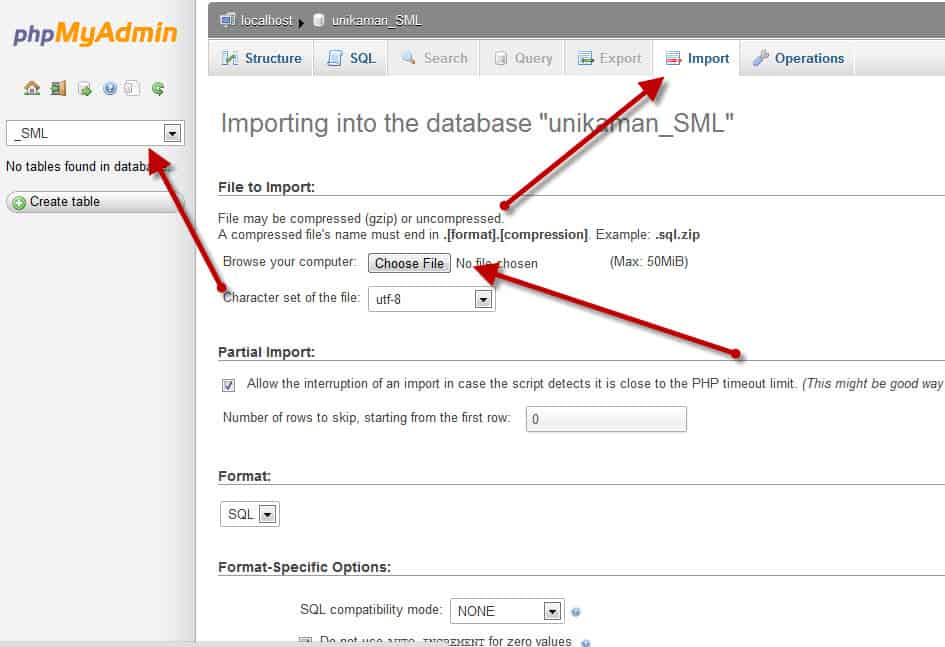
And on your hosting cPanel, go to Database > PHPMyAdmin >Select the database from Left side > Import and upload the backed up database file from old hosting.
- Save
If your database size is too huge and can’t be imported by default PHPMyAdmin importer, we will use a 3rd party tool call Bigdump.
If you need a tutorial for importing huge WordPress database, let me know, and I will write a separate tutorial for the same.
After importing is finished, click on Structure and note down the database prefix. Here is an example:

- Save
So, in this example migration, my WordPress DB prefix is: wp_7agot7_
Once it’s done, all you need to do is edit wp-config file and add the database information that we created above: Open your wp-config file from the root of your WordPress installation (Keep a backup of file before) and edit the details:
- Save
Also, search for q following line in wp-Config.php file: $table_prefix =
And replace the prefix with, our Db prefix which we have found using Structure under your PHPMyAdmin. Example:

- Save
Once you have done everything as mentioned in this tutorial, your site should be successfully migrated to new hosting. Now, all you need to do is verify all settings and make sure everything is working fine. Once you are sure about everything is working fine, go ahead and update Domain name servers to point to new hosting and in this case, it’s HostGator name servers.
Possible problem & solution after WordPress host migration:
After moving WordPress Webhosting company, your directory structure is changed. So, few of your plugins might not be working, or you might face a few issues. Here are some of the common problems which you might face, and here are the solution to those problems:
Weird Character problem:
After migrating MySQL database, you will notice some weird character in your WordPress blog in the new host. For example, characters like:  and ’.
You can use Search and replace WordPress plugin, to find all such weird characters and replace them altogether.
Image Upload problem:
After hosting migration, since your directory structure is changed you might get an error uploading new images. You need to go to Settings > Media under WordPress dashboard and edit the location of the WP-content directory under “Store uploads in this folder” options.
Similarly, you need to make changes for WP-DB manager or any other database backup plugin you are using to store the database on your server.
Also, take a note of .htaccess file, as most of the time you end up having a faulty or empty .htaccess file, which gives 404 error for all internal pages. You might like to reset your WordPress cache plugin, to update the .htaccess code.
This tutorial looks technical, but once you move WordPress blogs, you will realize it won’t take over 30-45 minutes for a perfect migration. However, time may differ based on the size of the database, wp-content folder, and your skills.
In fact, many of you can consider starting a service based on the same, and you can charge from 50-100$ for a hosting migration.
Quick recap:
- Take back up of WP-content and Database on the old server
- Edit Hosts file on Local Computer
- Install WordPress on the new Hosting server
- Upload WP-content folder
- Create Database, user, and password
- Import Database
- Update WP-config file on new server
- Verify everything
- Update Nameserver to point to new hosting
- Enjoy your website on new hosting
Update: You can also use WP Duplicator plugin to migrate WordPress blog. Here is a tutorial.
I hope this tutorial will help you to move WordPress site with Zero downtime, but if you are stuck anywhere, don’t forget to give me a shout for help via comment. If you find this tutorial useful, don’t forget to share it on Twitter and Facebook.
For further reading:
- Kinsta Managed Hosting Review: Is It Worth The Money & Hype?
- Web hosting with free website migration
Subscribe on YouTube
- Save
Sharing is caring ️
- More
How To Remove Indexed WordPress Categories, Tags, & Attachment Links From Google


