7 Important WordPress Terms Explained: WordPress Glossary


- Save
WordPress.com is a good blogging platform to start your career with. But over time, when you realize the real potential of blogging- for expressing yourself, for growing your business, and/or for making money, you will want to move your WordPress.com blog to a self-hosted WordPress (WordPress.org) blog.
To do that, follow this detailed guide to move your free WordPress.com blog to your own server. In this tutorial you will find answers to following questions:
- Can you switch from WordPress.com to WordPress.org?
- How to start a WordPress.org blog?
- How to move from WordPress.com to self-hosted WordPress without losing any search traffic?
- Do you need to cancel your WordPress.com subscription after moving?
If WordPress.org and WordPress.com terminology is confusing for you, you should read my earlier guide on the WordPress.com vs WordPress.org.
Now that you and I are on the same page, it’s time for you to make that big decision which you’ve wanted to make for a long time:


- Migrate your WordPress.com blog to your own hosting account.
This will remove all of the restrictions which you’ve had to face on your WordPress.com blog.
Also, in this guide, I’ll tell you how to make your new WordPress blog search engine friendly. Following my method, you should not lose any traffic or search engine results, and all of your earlier links (read about backlinks) should remain intact.
Page Contents
Moving From WordPress.com to Self-Hosted WordPress.org
For this guide, here is the scenario:
- Moving a WordPress.com blog with a custom domain name.
- Moving from the free hosted WordPress platform to the same domain name on SiteGround hosting.
- Another officially recommended host is BlueHost.
If your case is different from above (as in you don’t yet have a custom domain name), don’t worry! The guide is still the same. Simply ignore all the steps that are irrelevant.
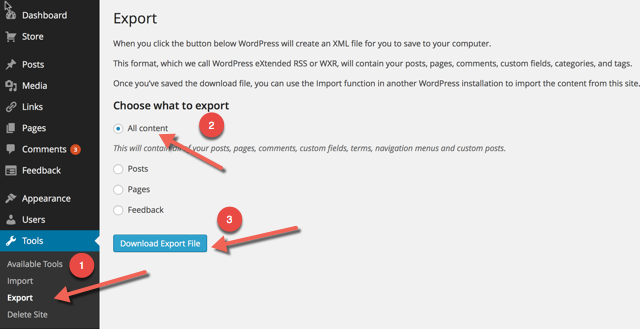
Exporting Your WordPress.com Blog:
To get started with the process, export your WordPress.com blog by following these steps.
- Log in to your WordPress.com dashboard.
- Click on Tools > Export.
- Select “All content”.
- Click on “Download Export File”.

- Save
This will download the .xml file of your WordPress.com blog. The next step is fairly simple, and all you need to do is set up WordPress on your new hosting account and import your .xml file. (All steps are mentioned below.)
Install WordPress and Import Content from WordPress.com
In my case, I am using SiteGround as my host. (Here is the step by step guide to installing WordPress on SiteGround.)
Since I’m migrating a WordPress.com blog with a custom domain, I’ve edited my hosts file on my Mac to access the site without changing the nameservers. (Here is the guide for editing a hosts file on Mac OS.)
Note: If you are not using a custom domain on WordPress.com, you don’t need to worry about changing your hosts file.
Once you have installed WordPress on your hosting, log in to your newly installed WordPress dashboard and delete the default post and page.
After that, go to Settings > Permalink and select “Day and name” as your permalink structure.

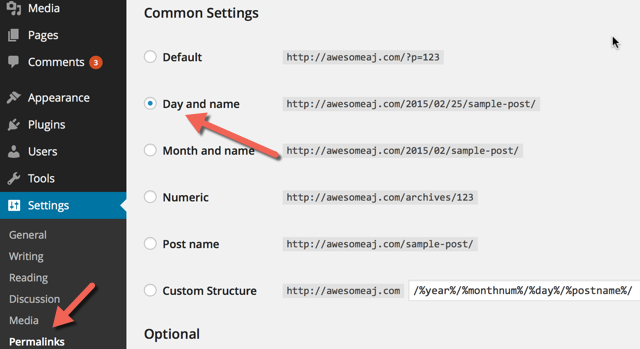
- Save
Now go to Tools > Import > WordPress.

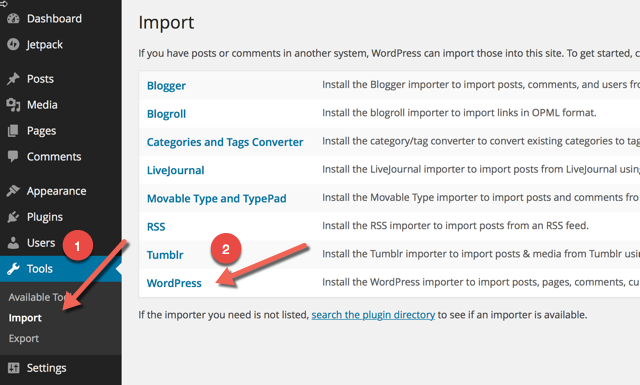
- Save
This will ask you to install the WordPress importer plugin. Install the plugin and upload the .xml file which we exported earlier.

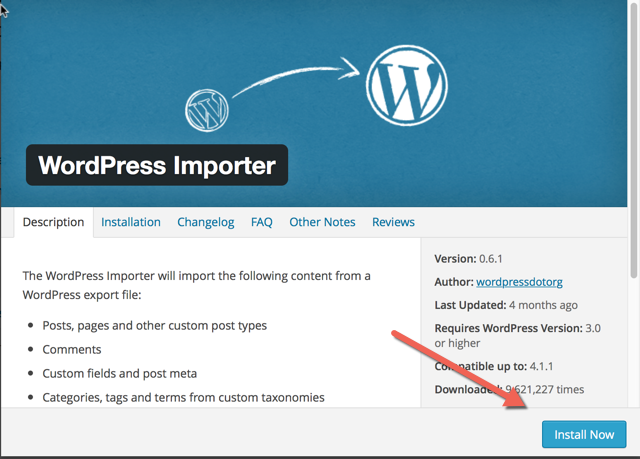
- Save

- Save
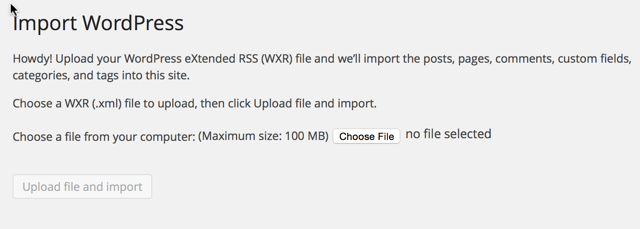
Note: Many web hosts have an upload limit of 2MB. You need to check the size of your exported .xml file and make sure that your hosting has a higher upload limit than the file itself. For example, in the above screen, you can see the maximum size is 100 MB.
- SiteGround offers a 100MB upload limit.
- Bluehost offers a 10MB upload limit.
If you need to increase the upload limit, you can edit the php.ini file, or can ask your hosting company’s support team and they will do it for you. Here are a few workarounds from the official WordPress support forum.
Once the file is uploaded, it will ask you to assign the author.

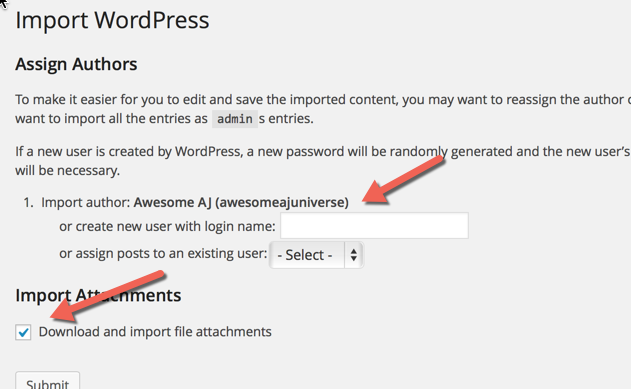
- Save
You can select “Download and import file attachments” to import all of your images and uploaded files to your hosting account. If you have too many attachments, this might fail, and you will need to repeat the above steps.
In my case, it failed after importing about 30 images, so I repeated this step and it imported more images. You can also use a plugin to import images from WordPress.com to your self-hosted WordPress blog.
How To Install WordPress on HostGator in 2021 [With Pictures]
Import Images from WordPress.com to WordPress.org:
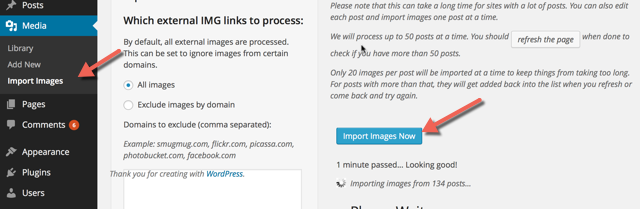
If, like me, you were unable to import all of your images, you can use a plugin called Import External Images. This is a simple plugin which lets you import all external images on your blog to your hosting account.
- Install and activate the plugin.
- Go to Media > Import images.
- Click on “Import images”.

- Save
Depending upon the number of posts and images, this will take a few minutes to import all of the images from WordPress.com.
After using this plugin, you should also use the Cache Images plugin to scan your site one more time. In my case, with the first plugin, only 60% of images were imported, and with the Cache Images plugin, all images from files.wordpress.com were imported.
Now that the images have been imported, 80% of the migration is complete.
301 Redirection Using Official Site Redirect Add-on
Note: Only perform this step if you haven’t been using a custom domain name.
This last step is important as you need to make this migration search engine friendly.
To make that happen, we need to take the WordPress.com blog address and have it automatically redirect to the new domain. This way you will not lose any traffic or backlinks pointing to your site.
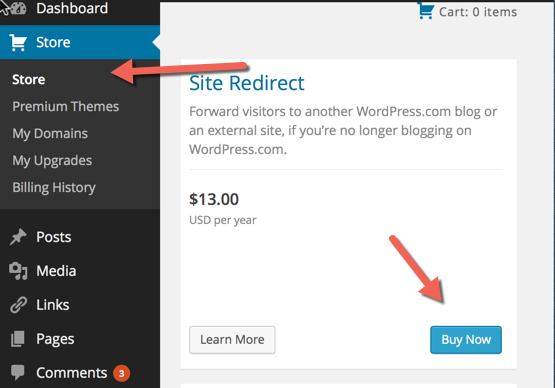
WordPress offers an add-on called Site Redirect which costs $13/year and offers a 301 permanent redirect. (“Permanent” or “301” redirects are search engine friendly redirects that ensure you don’t lose traffic after moving your WordPress.com blog to the self-hosted WordPress platform.)

- Save
Go to your WordPress.com site dashboard, click on “Store” and buy the Site Redirect add-on. Add your domain name there, and this add-on will take care of all further 301 redirections (aka search engine friendly redirections).
Migrating WordPress.com Subscribers to Self-Hosted WordPress:
You can migrate your WordPress.com subscribers to your self-hosted blog by using the JetPack plugin. Here is an official guide on how to do that.
And that’s it!
Your free WordPress.com blog has been successfully migrated to your own self-hosted WordPress platform.
Here are a few common FAQs:
Should I delete my WordPress.com blog?
If you are using the Site Redirect feature, you should not delete your WordPress.com blog. Also, if a few of your files (images) are still hosted on WordPress.com even after migration, you should not delete your blog.
What should I do with my WordPress.com blog?
Go to Settings > Reading in your WordPress.com blog and select the option which says “Search Engine Visibility”. This will discourage search engines from indexing your WordPress.com blog. This will not affect your new blog in any way.
What other things should I do after migration?
After migrating, you should configure your blog, install one of the essential SEO plugins, and read this guide on how to monetize your newly installed WordPress.org blog.
If you have any questions regarding migrating your free WordPress blog to a self-hosted one, or if you are facing any issues while following the above guide, feel free to let me know via the comments.
Don’t forget to share this guide with other WordPress.com users!
Subscribe on YouTube


- Save
Sharing is caring ️
- More
4 Crucial Things You Need To Know When Using WordPress